
noFSM
E3-Flasher Jailbreak (no-FSM)

The jailbreak method called "no-FSM" (no-Factory Service Mode) allows you to jailbreak your PS3 with a flash without having to go through the downgrade in 3.55 + access to the Factory, so no need to buy a dongle. This method is feasible with the E3-Flasher as well as the other different flashers available.
Prerequisite:
✅USB stick formatted in FAT32.
✅MicroSD memory card formatted in FAT32.
✅Update Pack E3-Flasher, available HERE.
Warning: This method is currently the easiest way to jailbreak your console, however, the risk 0 does not exist, I would not be in any case responsible if your console was to brick, which should not produce this if you follow this tutorial to the letter.
Starting the PS3
Once you have installed the E3-Flasher, start by starting your console with all the switches at the bottom like this:
Once you have all the switches down, you can start your PS3. The 8 blue LEDs above the SATA socket blink 4 by 4. Let your PS3 boot correctly so 10 or so seconds, once it's done, you can turn it off (with the power button, avoid using the joystick when using the E3).
⚠ Note: It is not impossible that you have a black screen on your TV when the console is on, it is not necessarily a problem. If this is the case at home, you can still continue the rest of the tutorial.
Update of the flasher
It will be necessary to start by updating the E3-Flasher, to do it, I advise you to take the update named "2011.10.28 update Samsung" which is present in the pack that you downloaded. In this folder you will have a file named "update.bin", put it at the root of your microSD memory card.
Once it's done, plug the memory card into its slot on the E3 then put the last 4 switches against the top like this:

Once you've done that, you can turn on your PS3. It will boot normally, and the 8 blue LEDs will all light up at that time, leave your console on for a few seconds for the E3-Flasher to update properly. You can then turn off your PS3 again (always with the power button).
Dump of the NOR
Now here is one of the most important steps, you will have to dump the flash memory of your PS3. To do this, switch the switches as follows: (always console off)

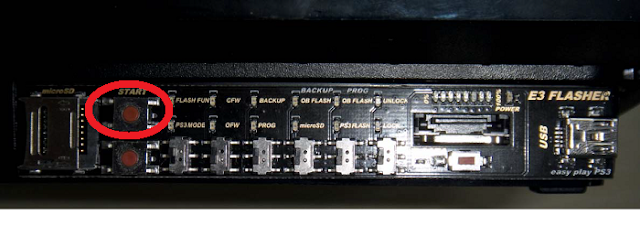
Once done, you can restart your PS3. Wait for it to boot properly so again a 10second. Once the console is correctly lit, the blue LEDs blink 4 by 4. You can then press the "Start" button on the E3 (green round button on the far left). Once you have pressed the button, the blue LEDs will turn off and after a moment they will light one by one (this indicates a loading bar somehow, the time can vary between 2-3 minutes). Once the process is complete, the blue LEDs will blink again 4 by 4.

For security reasons, repeat the maneuver 2 times, so you'll have 3 dumps of your memory available, we are never careful enough;). As said, once you have done your 3 dumps, turn off your PS3 and take your microSD and put it on your PC. Once you have opened your microSD, you will have 3 files called "bkpps3, bkpps31, bkpps32" the names may vary but that's how they are usually called). Copy these 3 dumps on your PC.
Dump patch
Once you've checked one of your dump and you're sure it's ok, you'll be able to patch it.
Again there is already a tutorial available on the site to do it, I will then still redirect you to it for ease:
Patch of a dump with PS3 Dump Checker: Tutorial available here.
Note: Small precision, for the control of the dump, it is indicated to make a reverse byte to be able to control it correctly. On the other hand for the patch, you can take the dump of origin (thus the one which was not byte-reversed) if this one is good.
Again I repeat, you just have to be careful to take the right version of the software corresponding to the basic version of your PS3, for the procedure, it remains the same.
Rewriting the dump patched on the NOR
Once your dump has been correctly patched, it will have to be rewritten on the console's memory. First, put your patched dump (which has been renamed "bkpps3.bin") to the root of your microSD memory card. Put it in its usual location on the E3-Flaher then place all the switches against the bottom like this:
Once it is done, turn on your PS3, once it has booted well (always wait a 10aine of seconds), press the button "Reset" of the E3-Flasher which it finds under the catch SATA.

Once you have pressed the "Reset" button, press the "Start" button.
The blue LEDs will stop blinking 4 by 4 to light 1 by 1 (as when creating the dump). This again indicates the loading.
Once the loading is finished, the LEDs will blink again 4 by 4, then you can turn off the PS3. And now, the re-writing of the dump patch is over.
CFW 4.xx installation
Now you do not need the E3-Flasher anymore, so you can remove it all and then put the DD back in place and put everything back together.
Once finished, you can turn on your PS3, you arrive at the XMB, officially you will still be in OFW 4.xx (depending on your basic version) but you can directly install a CFW 4.xx from the XMB via a USB key, as if you were doing a normal update thanks to the patches that were applied on the dump of your flash memory.
To install a CFW 4.xx, I also did a tutorial on the site, for convenience I will also redirected on:
Install a CFW 4.xx: Tutorial to install a CFW 4.xx.
You will no doubt understand, this tutorial shows you how to patch the flash memory of your console so as to remove the protections put by Sony to install a CFW, now that the patch has removed, you can install a CFW directly via a USB key.
And now, you will realize that the installation goes smoothly and that after restarting the console, you will find that you will be in CFW.
Role of the switches
For a better understanding of the role of E3-Flashe switches, here is a short descriptive list of roles:
- Switch No. 1: At the bottom, the switch has no specific role, the console turns normally and it does not influence. The switch is to put on the top when the console has undergone a YLOD software is that the welding SBE - NOR Tristate was carried out. This will force the power of the console. Switch to handle console off.
- Switch # 2: This switch is especially for the dual-boot, so when soldering the SBCE point is made. At the bottom, the console will turn on the NOR of the PS3, at the top, it will turn on the NOR of the E3-Flasher.
- Switch No. 3; This switch indicates writing (down) or reading (up), it is completed by switches 4 and 5. If the switch is down so it will be writing, switch 4 is then the source and the 5 the destination. So for example if switch 3, 4 and 5 down:
- Write (3 down) from the microSD (4 down) on the NOR of the PS3 (5 down)
If switch 3 and 4 down and the 5 in top:
- Write (3 at the bottom) from the microSD (4 at the bottom) on the NOR of the E3 (5 at the top).
If switch 3 at the bottom, 4 at the top and 5 at the bottom:
- Write (3 at the bottom) from the NOR of the E3 (4 at the top) on the NOR of the PS3 (5 at the bottom).
Now if the switch 3 is at the top, so it will be reading, the switch 4 becomes the destination, and the source 5
If switch 3 at the top, 4 and 5 at the bottom:
- Reading (3 in top), the NOR of the PS3 (5 at the bottom) on the microSD (4 at the bottom).
If switch 3 and 4 at the top and 5 at the bottom:
- Reading (3 at the top) of the NOR PS3 (5 at the bottom) on the NOR of the E3 (4 at the top).
It is not necessarily very obvious to be there at first but when you understand the principle, we understand the logic behind it and that a lot of combinations are possible. If you do one that is not possible, you will normally have an E3 error code. - Switch # 4: As seen with the 3, down this point on the microSD, and up on the NOR of the E3.
- Switch 5: Again seen with the 3, down it points to the NOR of the PS3 and up on the NOR of the E3.
- Switch 6: When the switch is down it has no influence, when it is up (usually 3.4 and 5 are too) it is for the update of the E3, if all the other switches at the bottom, it is for the console downgrade (file e3_downgrade.bin).
E3-Flasher error codes
It is possible that when using the E3-Flasher, at some point you would encounter an error code.
These appear like this:
You start a process (by pressing Start) but instead of the LEDs lighting up one by one, you have several flashing. For example, the 1st, 2nd and 6th. So we can interpret the error code like this:
You start a process (by pressing Start) but instead of the LEDs lighting up one by one, you have several flashing. For example, the 1st, 2nd and 6th. So we can interpret the error code like this:
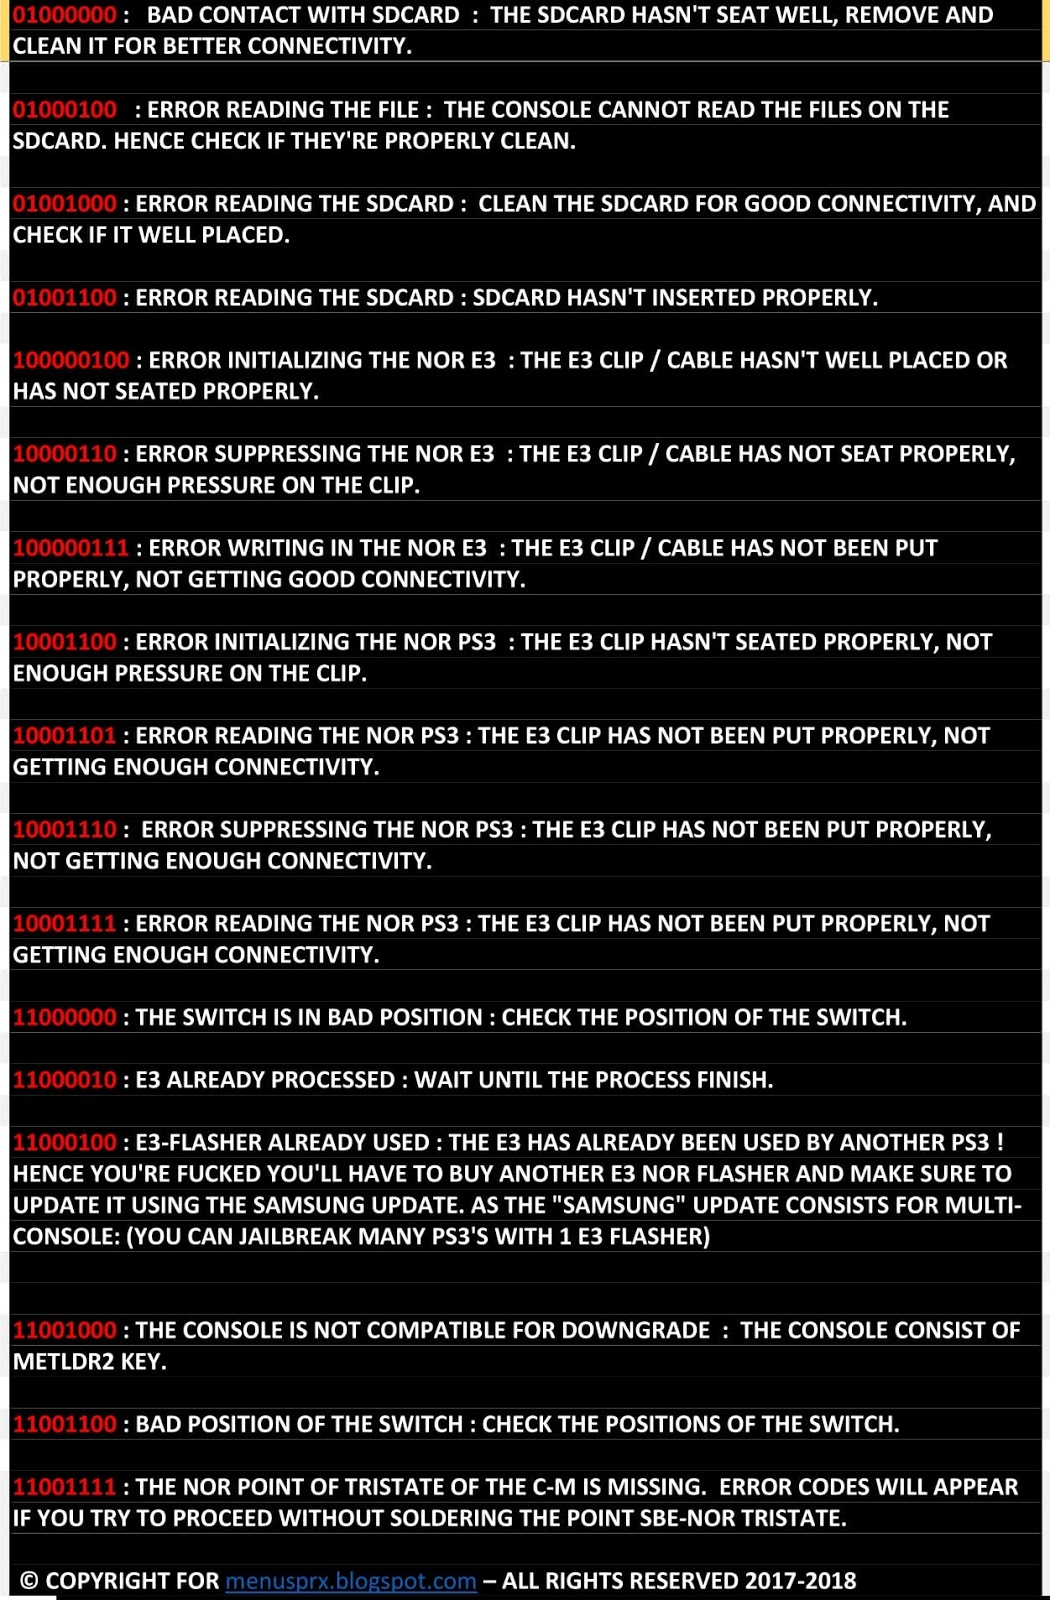
1 1 0 0 0 1 0 0.
The "1" represents the LEDs that are flashing, and the "0" represent the LEDs that are off. Below is a table showing which error code represents what and how to fix the problem.
The "1" represents the LEDs that are flashing, and the "0" represent the LEDs that are off. Below is a table showing which error code represents what and how to fix the problem.
Donate to Menusprx.blogspot.com
Was this tutorial helpful? You can donate to menusprx.blogspot.com
More information at this address: Donate menusprx.blogspot.com
No comments
Twitter:
https://twitter.com/krr_ish
Facebook:
https://goo.gl/vEmtb9
My Twitch channel:
https://goo.gl/iXe1q9
Kik:
https://goo.gl/a96bDy
Instagram:
https://goo.gl/tufV98
Snapchat username: krrishlobbyman
Google+:
https://goo.gl/9sJMe4
My Website:
https://menusprx.blogspot.com
Support Me:
https://goo.gl/v5vgqb
Buy modded ps4 / xbox 1 accounts: https://goo.gl/x5sDRG